 Here is the left rear cylinder head with the special tool in place.
A feeler gauge and the wrench are in place too, but you can
ignore those for now.
Here is the left rear cylinder head with the special tool in place.
A feeler gauge and the wrench are in place too, but you can
ignore those for now.
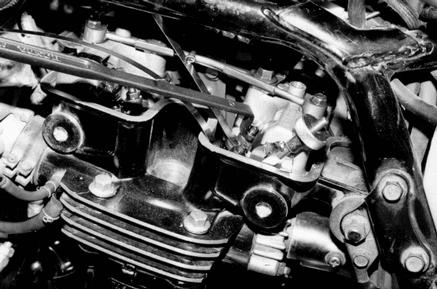
Here is the left rear cylinder head with the special tool in place.
A feeler gauge and the wrench are in place too, but you can
ignore those for now.
The official Honda method for adjusting valve clearance calls for removal of the timing cover and positioning the cam lobes according to timing marks. This ends up leaving the cam with no valve lift on either end. I use a different method taught to me by a mechanic. It has worked fine for me but I take no responsibility for any problems you may suffer from trying this method.
If you have read my other articles about the V4 cam problem you know that some of the contributing factors were variations in cam-to-bearing clearance and imprecise valve clearance. The goal of this modified method is to ensure precise valve clearance by ensuring that the camshaft is in a reliable position when setting the clearance. This method uses the Honda special tool but positions the camshaft differently from what the manual specifies.
To adjust the clearance on the near end of a camshaft, you position the camshaft so that the far end is at full lift and the near end has no lift. Then you install the special tool on the near end. The camshaft is thus secure and properly aligned: full lobe lift forces the far end up against the cover, and the special tool forces the near end up against the cover. Here's how.
You need not remove the timing cover to put the camshaft into this position. (This will save you the expense of a new gasket, by the way.) Instead, either put the bike in 2nd or 3rd gear and turn the engine over by rotating the back wheel by hand, or reconnect the wiring plugs that sat in that plastic tray above the rear cylinder pair, and blip the starter button with the transmission in neutral. Take the spark plugs out to make this all a lot easier and safer. The profile of the cam lobes on this engine is pretty gentle so the point at which the valve is at full lift is pretty wide. You don't need to obsess about achieving perfect full lift -- just eyeball it and when it looks like it's there, that's good enough. Once you've got the far end at full lift, install the special tool on the near end. Do not turn the engine over with the special tool in place or damage to the camshaft will occur!
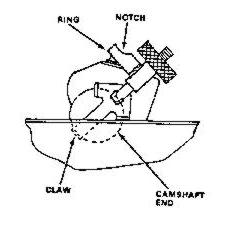 The claw at the bottom of the special tool hooks under the end of the camshaft,
and the ring at the top sits over the head of a bolt on the camshaft cover.
The foot in the middle rests against the edge of the cylinder head.
As you tighten the knurled knob (by hand only!), the camshaft
is lifted up against its cover.
The claw at the bottom of the special tool hooks under the end of the camshaft,
and the ring at the top sits over the head of a bolt on the camshaft cover.
The foot in the middle rests against the edge of the cylinder head.
As you tighten the knurled knob (by hand only!), the camshaft
is lifted up against its cover.
Now you're ready to check the clearance.
PREVIOUS STEP | NEXT STEP