V4 Valve Adjustment - Step Five
STEP FIVE: Check the Clearance
In the previous photo you saw two long feeler gauges in position,
one under each tappet of the pair in a rocker arm
that is actuated by a cam lobe.
You can see where the gauge slides in between the top of the valve
stem and the bottom of the threaded adjuster in the rocker arm.
A nice long gauge like the ones shown offers plenty of flexibility,
making it easier to get it into position.
It is important to use two feeler gauges at once so that
the rocker arm doesn't tilt when you're making measurements/adjustments.
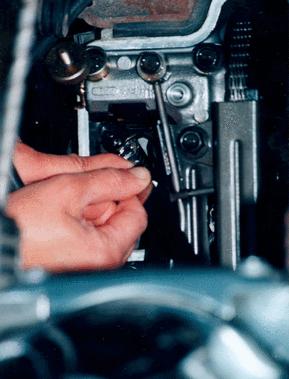 Don't be alarmed, but this photo shows the front right
cylinder just because it was easier to photograph at the angle I wanted
without other stuff in the way. You can see the special tool
at the top left above the person's hands.
The person's right hand is holding
one of the feeler gauges. The index finger of the left hand
is pressing down on the feeler gauge to put a bit of a curve in it
so that the gauge is sliding straight in to the gap.
Now you check the fit by sliding the gauge forward and backward.
Because you're pressing down on it enough to ensure a straight approach,
any drag you feel is mostly due to the valve clearance you're measuring.
Don't be alarmed, but this photo shows the front right
cylinder just because it was easier to photograph at the angle I wanted
without other stuff in the way. You can see the special tool
at the top left above the person's hands.
The person's right hand is holding
one of the feeler gauges. The index finger of the left hand
is pressing down on the feeler gauge to put a bit of a curve in it
so that the gauge is sliding straight in to the gap.
Now you check the fit by sliding the gauge forward and backward.
Because you're pressing down on it enough to ensure a straight approach,
any drag you feel is mostly due to the valve clearance you're measuring.
If the gauge won't go in at all, the gap is obviously too small.
If the gauge goes in very easily with no friction, the gap is too large.
You can try the next size up of gauge to help verify this.
If the gauge goes in and you feel a bit of drag, but not too much,
sort of like the amount of drag you'd feel pulling a slip of paper
out of the middle of a thick phone book, you have the right clearance.
You should not have to force the gauge into the gap (if so, it's too tight),
but you should feel a bit of drag.
PREVIOUS STEP | NEXT STEP